Introduction
I’ve been using Jenkins for a lot of years and it’s a very useful and simple to use tool, but there was something I always missed. It’s a tool that simplify project automation, but Jenkins automation itself was not so simple.
Configuring a Jenkins Job has always been a matter of clicking around the user interface, and this means:
-
Understanding what the job is doing was not simple in case of very complex jobs
-
If you need to modify the job you need to manually backup the configuration in case you need a rollback
-
Understanding the history of your job from the backed up configurations was a kind of a nightmare
With the release of Jenkins 2.0 something changed. The Pipeline plugin (formerly known as “workflow”) became part of the standard Jenkins distribution and so we have the possibility out-of-the-box to configure the executable part of our jobs using a Groovy script.
This script is simple to read and can be saved inside your software configuration manager (SCM) along all your project sources. This mainly solves the issues I mentioned before.
We still have some work to do manually. Job creation and scheduling configuration it’s not something we can do in the script. But it seems we are in the right direction towards full automation, so let’s try it!
Understanding what the job is doing was not simple in case of very complex jobs
If you need to modify the job you need to manually backup the configuration in case you need a rollback
Understanding the history of your job from the backed up configurations was a kind of a nightmare
Prerequisites
To follow this article you need:
-
Basic knowledge of Jenkins
-
Access to a Jenkins 2 installation to try the examples
-
Basic knowledge of Git/GitHub and a GitHub account
-
Basic knowledge of Maven
Basic knowledge of Jenkins
Access to a Jenkins 2 installation to try the examples
Basic knowledge of Git/GitHub and a GitHub account
Basic knowledge of Maven
First pipeline
In this first part we are going to write a “Hello World!” job that simply writes a message in the log a nothing else. In this way we remain focused on what Jenkins is doing and we have not to think to the complexities of the build, test and other side tools. In the following part we will write a more complete Pipeline script.
To create our “Hello World!” job click on “New item” in the Jenkins home page.
You will be redirected to the job creation page.
Here you will be asked to enter the job name and to select the job type.
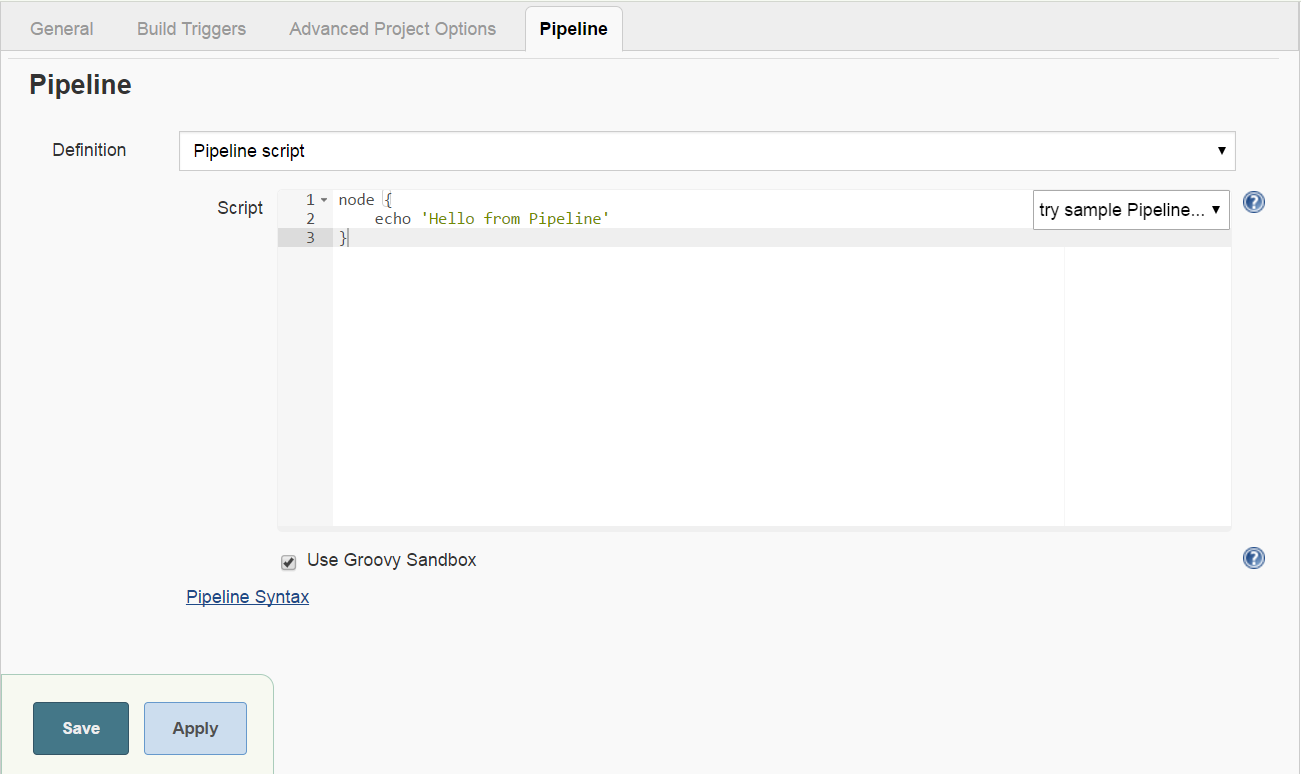
Select “Pipeline” and then click “Ok”, Jenkins will show you the job configuration page.
Copy the following in the Pipeline script box and click “Save”
node {
echo 'Hello from Pipeline'
}
You have just created your first pipeline job and you are in this job home page.
Click “Build Now” to launch the script.
When the build ends, go to Console Output and you’ll see something like:
Started by user anonymous
[Pipeline] node
Running on master in C:\Users\andrea\.jenkins\workspace\First Pipeline
[Pipeline] {
[Pipeline] echo
Hello from Pipeline
[Pipeline] }
[Pipeline] // node
[Pipeline] End of Pipeline
Finished: SUCCESS
Congratulations! You’ve created and run your first Jenkins Pipeline job.
echo 'Hello from Pipeline'
}
[Pipeline] node
Running on master in C:\Users\andrea\.jenkins\workspace\First Pipeline
[Pipeline] {
[Pipeline] echo
Hello from Pipeline
[Pipeline] }
[Pipeline] // node
[Pipeline] End of Pipeline
Finished: SUCCESS
First Jenkinsfile
Developing and maintaining the Pipeline script in that little box in the Jenkins UI is not ideal.
Fortunately Jenkins is able to retrieve your script from the SCM so you can put it along with the rest of your project source files.
Just to try it, create a project on GitHub with just a single file in it called Jenkinsfile.
The content of this file will be the Pipeline script:
node {
echo 'Hello from Jenkinsfile'
}
Create a new Jenkins job as before.
When you are in the configuration page, in Pipeline Definition choose “Pipeline script from SCM” and fill in the other fields like in the following image

ATTENTION! You should fill the Repository URL field with your GitHub project repository URL.
When you save you’ll be redirected to the job home page.
Click “Build Now” and when it finishes building go to Console Output and you’ll see something like:
Started by user anonymous
Cloning the remote Git repository
Cloning repository https://github.com/amattioli/firstjenkinsfile.git
> C:\Program Files (x86)\Git\bin\git.exe init C:\Users\andrea\.jenkins\workspace\First Jenkinsfile@script # timeout=10
Fetching upstream changes from https://github.com/amattioli/firstjenkinsfile.git
> C:\Program Files (x86)\Git\bin\git.exe --version # timeout=10
using GIT_ASKPASS to set credentials Personal GitHub
> C:\Program Files (x86)\Git\bin\git.exe fetch --tags --progress https://github.com/amattioli/firstjenkinsfile.git +refs/heads/*:refs/remotes/origin/*
> C:\Program Files (x86)\Git\bin\git.exe config remote.origin.url https://github.com/amattioli/firstjenkinsfile.git # timeout=10
> C:\Program Files (x86)\Git\bin\git.exe config --add remote.origin.fetch +refs/heads/*:refs/remotes/origin/* # timeout=10
> C:\Program Files (x86)\Git\bin\git.exe config remote.origin.url https://github.com/amattioli/firstjenkinsfile.git # timeout=10
Fetching upstream changes from https://github.com/amattioli/firstjenkinsfile.git
using GIT_ASKPASS to set credentials Personal GitHub
> C:\Program Files (x86)\Git\bin\git.exe fetch --tags --progress https://github.com/amattioli/firstjenkinsfile.git +refs/heads/*:refs/remotes/origin/*
> C:\Program Files (x86)\Git\bin\git.exe rev-parse "refs/remotes/origin/master^{commit}" # timeout=10
> C:\Program Files (x86)\Git\bin\git.exe rev-parse "refs/remotes/origin/origin/master^{commit}" # timeout=10
Checking out Revision 06bcf7d2883a213fbc275f504bfccdb35835330e (refs/remotes/origin/master)
> C:\Program Files (x86)\Git\bin\git.exe config core.sparsecheckout # timeout=10
> C:\Program Files (x86)\Git\bin\git.exe checkout -f 06bcf7d2883a213fbc275f504bfccdb35835330e
First time build. Skipping changelog.
[Pipeline] node
Running on master in C:\Users\andrea\.jenkins\workspace\First Jenkinsfile
[Pipeline] {
[Pipeline] echo
Hello from Jenkinsfile
[Pipeline] }
[Pipeline] // node
[Pipeline] End of Pipeline
Finished: SUCCESS
As you can see it downloaded the script from GitHub and executed it.
Cloning the remote Git repository
Cloning repository https://github.com/amattioli/firstjenkinsfile.git
> C:\Program Files (x86)\Git\bin\git.exe init C:\Users\andrea\.jenkins\workspace\First Jenkinsfile@script # timeout=10
Fetching upstream changes from https://github.com/amattioli/firstjenkinsfile.git
> C:\Program Files (x86)\Git\bin\git.exe --version # timeout=10
using GIT_ASKPASS to set credentials Personal GitHub
> C:\Program Files (x86)\Git\bin\git.exe fetch --tags --progress https://github.com/amattioli/firstjenkinsfile.git +refs/heads/*:refs/remotes/origin/*
> C:\Program Files (x86)\Git\bin\git.exe config remote.origin.url https://github.com/amattioli/firstjenkinsfile.git # timeout=10
> C:\Program Files (x86)\Git\bin\git.exe config --add remote.origin.fetch +refs/heads/*:refs/remotes/origin/* # timeout=10
> C:\Program Files (x86)\Git\bin\git.exe config remote.origin.url https://github.com/amattioli/firstjenkinsfile.git # timeout=10
Fetching upstream changes from https://github.com/amattioli/firstjenkinsfile.git
using GIT_ASKPASS to set credentials Personal GitHub
> C:\Program Files (x86)\Git\bin\git.exe fetch --tags --progress https://github.com/amattioli/firstjenkinsfile.git +refs/heads/*:refs/remotes/origin/*
> C:\Program Files (x86)\Git\bin\git.exe rev-parse "refs/remotes/origin/master^{commit}" # timeout=10
> C:\Program Files (x86)\Git\bin\git.exe rev-parse "refs/remotes/origin/origin/master^{commit}" # timeout=10
Checking out Revision 06bcf7d2883a213fbc275f504bfccdb35835330e (refs/remotes/origin/master)
> C:\Program Files (x86)\Git\bin\git.exe config core.sparsecheckout # timeout=10
> C:\Program Files (x86)\Git\bin\git.exe checkout -f 06bcf7d2883a213fbc275f504bfccdb35835330e
First time build. Skipping changelog.
[Pipeline] node
Running on master in C:\Users\andrea\.jenkins\workspace\First Jenkinsfile
[Pipeline] {
[Pipeline] echo
Hello from Jenkinsfile
[Pipeline] }
[Pipeline] // node
[Pipeline] End of Pipeline
Finished: SUCCESS
First Multibranch
Git users usually create a lot of branches on their SCM. Having to create and maintain a different Jenkins job for each branch has always been a nightmare.
With Jenkins Pipelines now we have the possibility to create a multibranch job that automatically have subjobs for each branch in your SCM repository.
Let’s try this!
First, create another branch on your GitHub project and change the hello message.
Now create the Jenkins job, but this time select “Multibranch Pipeline” as the job type.
In the “Branch Sources” section click Add Source and choose GitHub
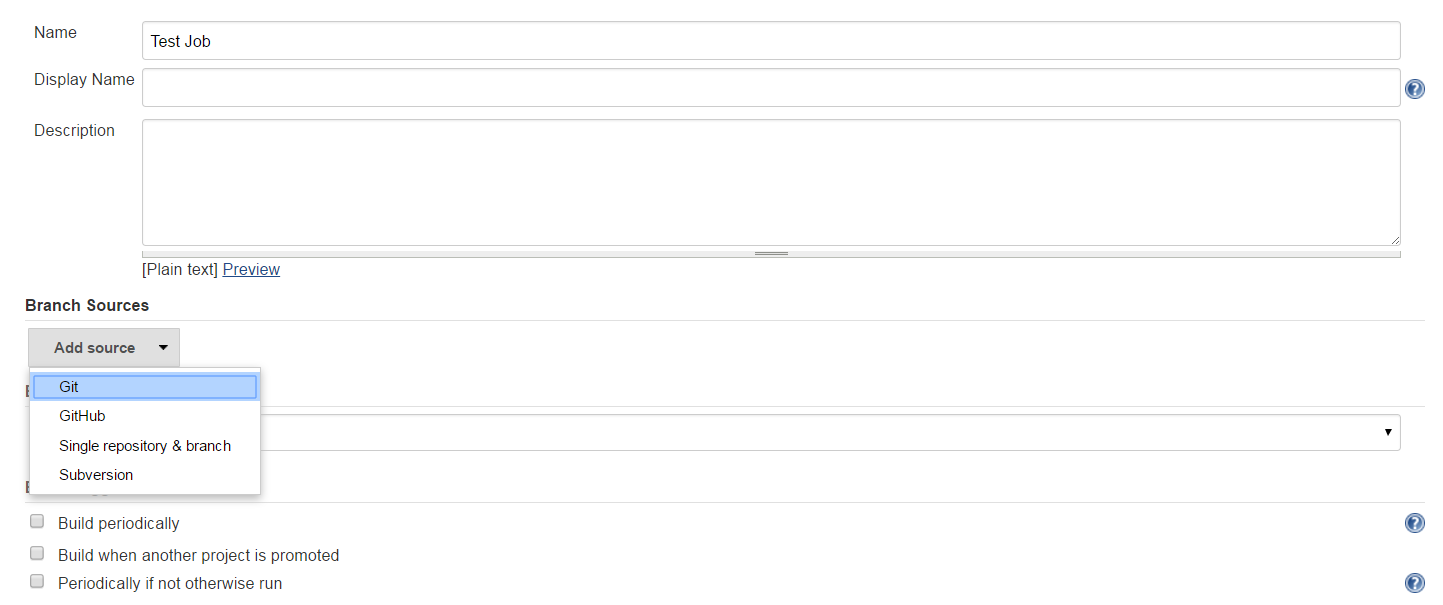
A GitHub specific set of fields appear.
When you fill the “Owner” field with your GitHub user name, the ”Repository” drop down list will be automatically filled with the list of your public GitHub repositories.
Select the right repository from this list and save.
Jenkins answers with a log like the following:
Started
Connecting to https://api.github.com using andreamattioli@yahoo.it/****** (Personal GitHub)
Looking up amattioli/firstjenkinsfile
Getting remote pull requests...
0 pull requests were processed
Getting remote branches...
Checking branch master
‘Jenkinsfile’ exists in this branch
Met criteria
Scheduled build for branch: master
Checking branch secondary
‘Jenkinsfile’ exists in this branch
Met criteria
Scheduled build for branch: secondary
2 branches were processed
Done examining amattioli/firstjenkinsfile
Finished: SUCCESS
What you obtain is a folder called “First Multibranch” with two jobs in it, one for each branch.
You can run each branch job separately but triggering can be configured for the entire folder so you don’t have to manually schedule each branch.
Looking up amattioli/firstjenkinsfile
Getting remote pull requests...
0 pull requests were processed
Getting remote branches...
Checking branch master
Met criteria
Scheduled build for branch: master
Checking branch secondary
‘Jenkinsfile’ exists in this branch
Met criteria
Scheduled build for branch: secondary
2 branches were processed
Done examining amattioli/firstjenkinsfile
Finished: SUCCESS