lunedì 7 novembre 2016

Jenkins Pipeline Basic Tutorial - Part 1

Introduction

I’ve been using Jenkins for a lot of years and it’s a very useful and simple to use tool, but there was something I always missed. It’s a tool that simplify project automation, but Jenkins automation itself was not so simple.
Configuring a Jenkins Job has always been a matter of clicking around the user interface, and this means:
  • Understanding what the job is doing was not simple in case of very complex jobs
  • If you need to modify the job you need to manually backup the configuration in case you need a rollback
  • Understanding the history of your job from the backed up configurations was a kind of a nightmare
With the release of Jenkins 2.0 something changed. The Pipeline plugin (formerly known as “workflow”) became part of the standard Jenkins distribution and so we have the possibility out-of-the-box to configure the executable part of our jobs using a Groovy script.
This script is simple to read and can be saved inside your software configuration manager (SCM) along all your project sources. This mainly solves the issues I mentioned before.
We still have some work to do manually. Job creation and scheduling configuration it’s not something we can do in the script. But it seems we are in the right direction towards full automation, so let’s try it!

Prerequisites

To follow this article you need:
  • Basic knowledge of Jenkins
  • Access to a Jenkins 2 installation to try the examples
  • Basic knowledge of Git/GitHub and a GitHub account
  • Basic knowledge of Maven

First pipeline

In this first part we are going to write a “Hello World!” job that simply writes a message in the log a nothing else. In this way we remain focused on what Jenkins is doing and we have not to think to the complexities of the build, test and other side tools. In the following part we will write a more complete Pipeline script.

To create our “Hello World!” job click on “New item” in the Jenkins home page.
You will be redirected to the job creation page.
Here you will be asked to enter the job name and to select the job type.
Select “Pipeline” and then click “Ok”, Jenkins will show you the job configuration page.

Copy the following in the Pipeline script box and click “Save”

node {
   echo 'Hello from Pipeline'
}
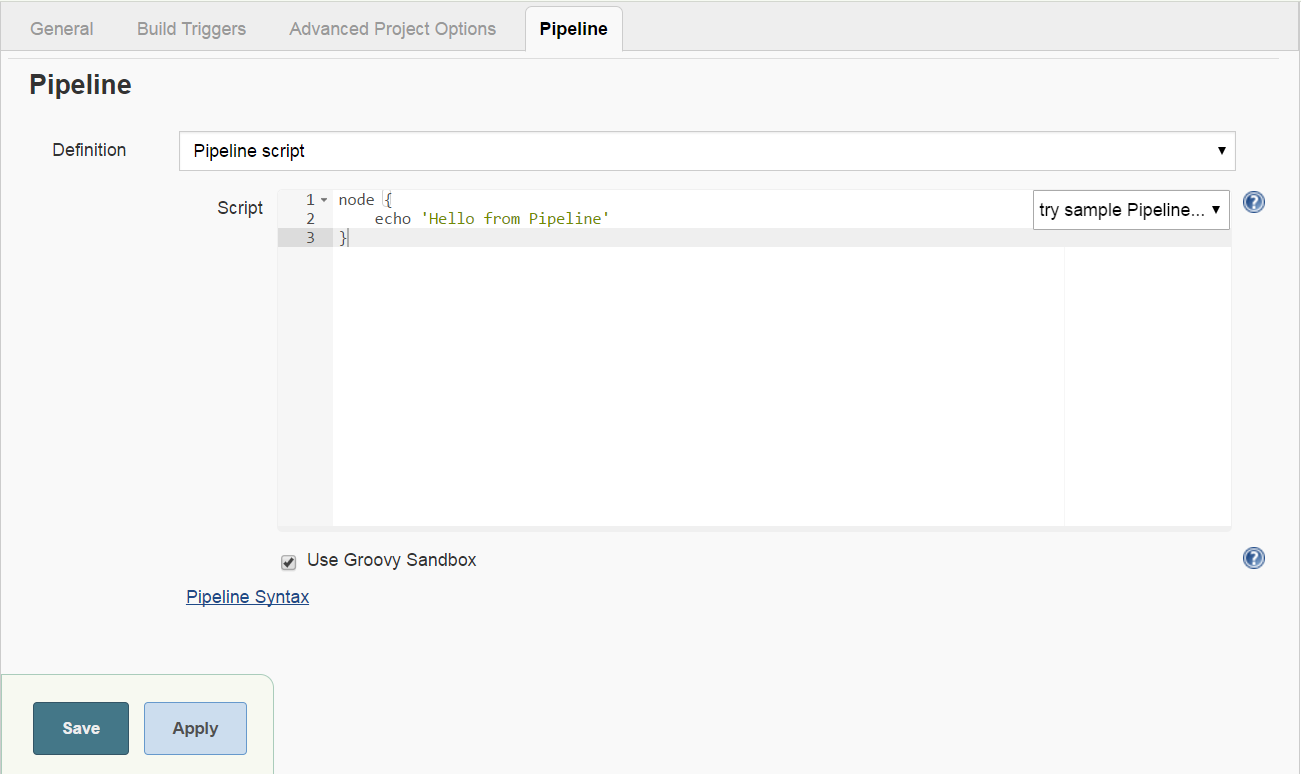

You have just created your first pipeline job and you are in this job home page.

Click “Build Now” to launch the script.

When the build ends, go to Console Output and you’ll see something like:

Started by user anonymous
[Pipeline] node
Running on master in C:\Users\andrea\.jenkins\workspace\First Pipeline
[Pipeline] {
[Pipeline] echo
Hello from Pipeline
[Pipeline] }
[Pipeline] // node
[Pipeline] End of Pipeline
Finished: SUCCESS

Congratulations! You’ve created and run your first Jenkins Pipeline job.

First Jenkinsfile

Developing and maintaining the Pipeline script in that little box in the Jenkins UI is not ideal.
Fortunately Jenkins is able to retrieve your script from the SCM so you can put it along with the rest of your project source files.

Just to try it, create a project on GitHub with just a single file in it called Jenkinsfile.
The content of this file will be the Pipeline script:

node {
   echo 'Hello from Jenkinsfile'
}

Create a new Jenkins job as before.

When you are in the configuration page, in Pipeline Definition choose “Pipeline script from SCM” and fill in the other fields like in the following image


ATTENTION! You should fill the Repository URL field with your GitHub project repository URL.

When you save you’ll be redirected to the job home page.

Click “Build Now” and when it finishes building go to Console Output and you’ll see something like:

Started by user anonymous
Cloning the remote Git repository
Cloning repository https://github.com/amattioli/firstjenkinsfile.git
> C:\Program Files (x86)\Git\bin\git.exe init C:\Users\andrea\.jenkins\workspace\First Jenkinsfile@script # timeout=10
Fetching upstream changes from https://github.com/amattioli/firstjenkinsfile.git
> C:\Program Files (x86)\Git\bin\git.exe --version # timeout=10
using GIT_ASKPASS to set credentials Personal GitHub
> C:\Program Files (x86)\Git\bin\git.exe fetch --tags --progress https://github.com/amattioli/firstjenkinsfile.git +refs/heads/*:refs/remotes/origin/*
> C:\Program Files (x86)\Git\bin\git.exe config remote.origin.url https://github.com/amattioli/firstjenkinsfile.git # timeout=10
> C:\Program Files (x86)\Git\bin\git.exe config --add remote.origin.fetch +refs/heads/*:refs/remotes/origin/* # timeout=10
> C:\Program Files (x86)\Git\bin\git.exe config remote.origin.url https://github.com/amattioli/firstjenkinsfile.git # timeout=10
Fetching upstream changes from https://github.com/amattioli/firstjenkinsfile.git
using GIT_ASKPASS to set credentials Personal GitHub
> C:\Program Files (x86)\Git\bin\git.exe fetch --tags --progress https://github.com/amattioli/firstjenkinsfile.git +refs/heads/*:refs/remotes/origin/*
> C:\Program Files (x86)\Git\bin\git.exe rev-parse "refs/remotes/origin/master^{commit}" # timeout=10
> C:\Program Files (x86)\Git\bin\git.exe rev-parse "refs/remotes/origin/origin/master^{commit}" # timeout=10
Checking out Revision 06bcf7d2883a213fbc275f504bfccdb35835330e (refs/remotes/origin/master)
> C:\Program Files (x86)\Git\bin\git.exe config core.sparsecheckout # timeout=10
> C:\Program Files (x86)\Git\bin\git.exe checkout -f 06bcf7d2883a213fbc275f504bfccdb35835330e
First time build. Skipping changelog.
[Pipeline] node
Running on master in C:\Users\andrea\.jenkins\workspace\First Jenkinsfile
[Pipeline] {
[Pipeline] echo
Hello from Jenkinsfile
[Pipeline] }
[Pipeline] // node
[Pipeline] End of Pipeline
Finished: SUCCESS

As you can see it downloaded the script from GitHub and executed it.

First Multibranch

Git users usually create a lot of branches on their SCM. Having to create and maintain a different Jenkins job for each branch has always been a nightmare.
With Jenkins Pipelines now we have the possibility to create a multibranch job that automatically have subjobs for each branch in your SCM repository.

Let’s try this!

First, create another branch on your GitHub project and change the hello message.

Now create the Jenkins job, but this time select “Multibranch Pipeline” as the job type.

In the “Branch Sources” section click Add Source and choose GitHub
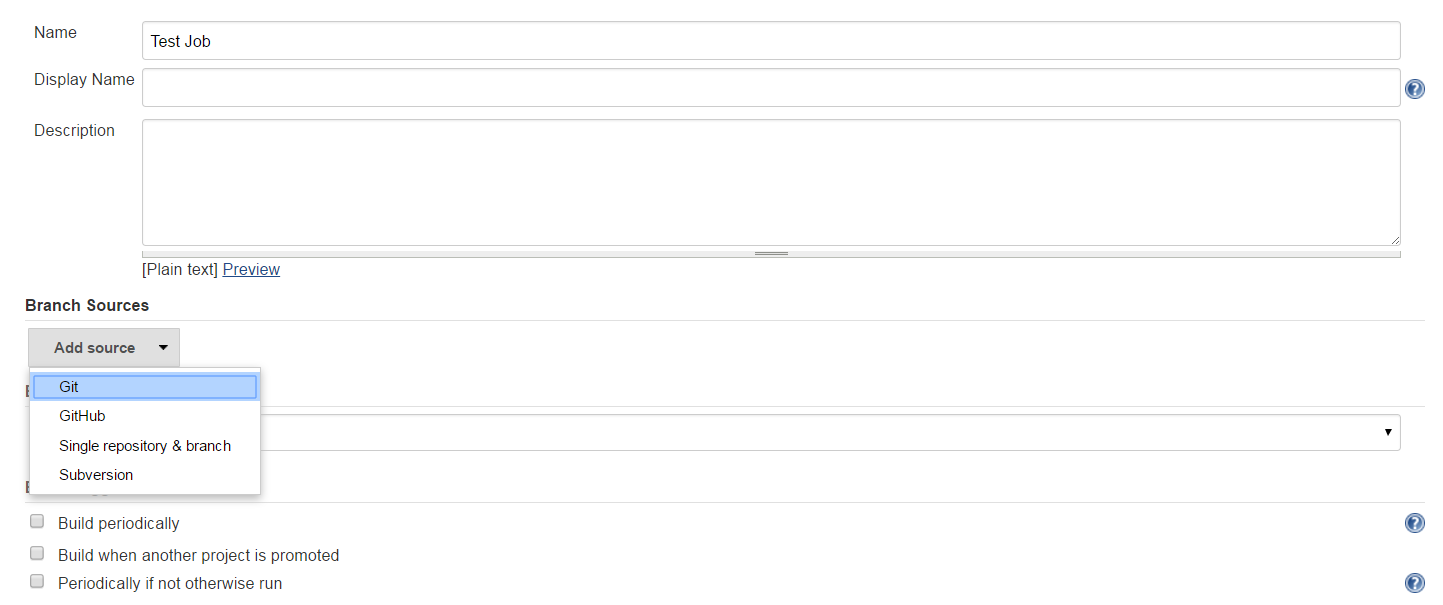

A GitHub specific set of fields appear.
When you fill the “Owner” field with your GitHub user name, the ”Repository” drop down list will be automatically filled with the list of your public GitHub repositories.
Select the right repository from this list and save.
Jenkins answers with a log like the following:

Started
Connecting to https://api.github.com using andreamattioli@yahoo.it/****** (Personal GitHub)
Looking up amattioli/firstjenkinsfile

 Getting remote pull requests...

 0 pull requests were processed

 Getting remote branches...

   Checking branch master
    ‘Jenkinsfile’ exists in this branch
   Met criteria
Scheduled build for branch: master

   Checking branch secondary
     ‘Jenkinsfile’ exists in this branch
   Met criteria
Scheduled build for branch: secondary

 2 branches were processed

Done examining amattioli/firstjenkinsfile

Finished: SUCCESS

What you obtain is a folder called “First Multibranch” with two jobs in it, one for each branch.
You can run each branch job separately but triggering can be configured for the entire folder so you don’t have to manually schedule each branch.

Conclusions

That's all for this first part.
In the second part we will build a real Java project using Jenkins pipelines.

lunedì 18 maggio 2015

Installing ang configuring Jenkins using Chef - Part 2 - Introducing Vagrant

In the first part of this series we created a Chef cookbook that installs Jenkins, configure it and creates a new Job.
Now we have to execute it.
The simplest thing we can do is directly launching Chef on the machine we are working with:

sudo chef-client --local-mode --runlist 'recipe[jenkins_server]'

This installs Jenkins on the same machine. If we need to install Jenkins on another machine we could move our cookbook on a Chef server and then our target machine can grab it from the server and execute it locally.

But today I want to show you a third way that I find very effective for development environments: installing on a virtual machine managed by Vagrant.

Vagrant is a tool that allows you to easily create and configure virtual machines in a reproducible way. Vagrant does not run the virtual machine itself but instead stands on the shoulders of giants like VirtualBox, VMware, AWS, etc.

If we install Vagrant (and a virtualization tool, for example VirtualBox) we only have to create a little script like:

Vagrant.configure(2) do |config|
  config.vm.box = "hashicorp/precise32"
end

and call it "Vagrantfile". When you launch the command

vagrant up

Vagrant will:
  • download from its repository the VM you requested, in our case an Ubuntu 12.04 (Precise Pangolin) 32 bit VM
  • identify your virtualization tool (VirtualBox?)
  • import the VM in your virtualization tool
  • launch the VM
The VM (or 'box, as Vagrant calls it) is downloaded only the first time. Successive uses of the same box does not require a new download.

To stop the VM the command is:

vagrant halt

The VM will remain available for successive restart with vagrant up. If we want to completely remove the VM use

vagrant destroy

We can put in our Vagrantfile some network configuration, for example with

Vagrant.configure(2) do |config|
  config.vm.box = "hashicorp/precise32"
  config.vm.network "public_network", ip: "192.168.0.50"
end

we are saying Vagrant that we want our VM published on our local network with the given IP address. In this way we can access our VM with ssh (user: vagrant pwd: vagrant).

To launch Jenkins on our VM, first install the vagrant berkshelf plugin.

vagrant plugin install vagrant-berkshelf

In this way Vagrant will be able to automatically download the cookbooks from the Chef supermarket.

Then modify our Vagrantfile in this way:

Vagrant.configure(2) do |config|
  config.vm.box = "hashicorp/precise32"
  config.vm.network "public_network", ip: "192.168.0.52"

  config.berkshelf.enabled = true

  config.vm.provision "chef_solo" do |chef|
    chef.add_recipe "tomcat_server"
  end
end

and in the same directory put a file called Berksfile containing

source 'https://supermarket.chef.io'

cookbook 'jenkins_server', path: './cookbooks/jenkins_server'

Now copy your cookbook in the directory specified in the Berksfile and you are able to launch a VM with Jenkins installed and configured.

Notice that all the files we have created until now are text files contained in a single directory. You can copy this directory wherever you want and, supposed you installed Vagrant and a Virtualization tool, you can launch a full configured Jenkins machine in minutes.

You can even put it on a versioning server (Git, Subversion, etc.) so you can maintain and branch it whenever you want.

The directory contains only a few kbytes of text files. Imagine you want to do the same thing using an exported VM. The resulting file will weight a lot of Gbytes. And if you need different versions you have to maitain a lot of this heavyweight files!

It's all for now. In the next part we will talk about how the solve the problems we left behind in the first part.

martedì 12 maggio 2015

Installing and configuring Jenkins using Chef

Installing Jenkins with Chef is really simple. There is a Jenkins cookbook in the Chef Supermarket so it's a matter of including a couple of recipes from it.

But installation is only the first part of the work. We also need configuration, job creation, etc. The same Jenkins cookbook offers a set of resources that help us but if you've always configured Jenkins using the web interface (like me) it's not so obvious how to use them.

So I started some experiments and finally I obtained a full working job. And this is what I did...

The goal was to have a working Maven job that downloads the sources from a Subversion repository and build the project.

Doing this manually requires the following steps:
  • install Jenkins
  • configure JDK installation
  • configure Maven installation
  • create the job
We want to do all this automatically using Chef so, after creating a new Chef cookbook with

chef generate cookbook cookbooks/jenkins_server 

the first thing to do is adding a dependency in metadata.rb so Berkshelf can automatically download the Jenkins cookbook and all its dependencies from the supermarket

depends 'jenkins', '~> 2.2.2'

Then we need to write our recipe, so in recipes/default.rb we add:

include_recipe 'jenkins::java'
include_recipe 'jenkins::master'

These two recipes, included from the Jenkins cookbook, install the JDK and Jenkins itself. The Jenkins service is started too.

Then we have to start configuration. It can be done in multiple ways but I chose to directly manipulate jenkins config files. Probably using a groovy script is more elegant but it requires more study!

template "#{node['jenkins']['master']['home']}/config.xml" do
  source "config.xml.erb"
end

These 3 lines simply copy the config.xml file from the templates cookbooks directory in the right position.

To obtain a template config.xml simply copy it from an existing Jenkins installation and remove all the unnecessary part.

I got the following:

<?xml version='1.0' encoding='UTF-8'?>
<hudson>
  <disabledAdministrativeMonitors/>
  <version>1.612</version>
  <numExecutors>2</numExecutors>
  <mode>NORMAL</mode>
  <useSecurity>true</useSecurity>
  <authorizationStrategy class="hudson.security.AuthorizationStrategy$Unsecured"/>
  <securityRealm class="hudson.security.SecurityRealm$None"/>
  <disableRememberMe>false</disableRememberMe>
  <projectNamingStrategy class="jenkins.model.ProjectNamingStrategy$DefaultProjectNamingStrategy"/>
  <workspaceDir>${ITEM_ROOTDIR}/workspace</workspaceDir>
  <buildsDir>${ITEM_ROOTDIR}/builds</buildsDir>
  <systemMessage>This is jenkins</systemMessage>
  <jdks>
    <jdk>
      <name>Default JDK</name>
      <home>/usr/lib/jvm/java-1.7.0-openjdk-i386</home>
      <properties/>
    </jdk>
  </jdks>
  <viewsTabBar class="hudson.views.DefaultViewsTabBar"/>
  <myViewsTabBar class="hudson.views.DefaultMyViewsTabBar"/>
  <clouds/>
  <quietPeriod>5</quietPeriod>
  <scmCheckoutRetryCount>0</scmCheckoutRetryCount>
  <views>
    <hudson.model.AllView>
      <owner class="hudson" reference="../../.."/>
      <name>All</name>
      <filterExecutors>false</filterExecutors>
      <filterQueue>false</filterQueue>
      <properties class="hudson.model.View$PropertyList"/>
    </hudson.model.AllView>
  </views>
  <primaryView>All</primaryView>
  <slaveAgentPort>0</slaveAgentPort>
  <label></label>
  <nodeProperties/>
  <globalNodeProperties/>
</hudson>

As you can see there are only two things I had to customize:

  • the JDK installation
  • the default view
I used the same JDK that run Jenkins without installing a new one. The JDK installation has a problem here. I had to hard wire the path of the JDK dir. In a subsequent post we'll see how to solve this problem.

And now we have to install Maven. We can let Jenkins install it for us putting the right file in the right position with:

template "#{node['jenkins']['master']['home']}/hudson.tasks.Maven.xml" do
 source 'hudson.tasks.Maven.xml.erb'
end

The hudson.tasks.Maven.xml.erb we should put in our templates dir is:

<?xml version='1.0' encoding='UTF-8'?>
<hudson.tasks.Maven_-DescriptorImpl>
  <installations>
    <hudson.tasks.Maven_-MavenInstallation>
      <name>Default Maven</name>
      <properties>
        <hudson.tools.InstallSourceProperty>
          <installers>
            <hudson.tasks.Maven_-MavenInstaller>
              <id>3.2.2</id>
            </hudson.tasks.Maven_-MavenInstaller>
          </installers>
        </hudson.tools.InstallSourceProperty>
      </properties>
    </hudson.tasks.Maven_-MavenInstallation>
  </installations>
</hudson.tasks.Maven_-DescriptorImpl>

To have a flexible cookbook we can substitute the Maven version with an attribute that can be customized using a Chef role or environment but now I want to keep the whole thing as simple as possible.

After the configuration files are copied in the right place Jenkins has to reload the configuration, so:

jenkins_command 'reload-configuration'


The last thing to do is job creation. In the Jenkins cookbook there is a resource for that but it needs a job configuration file that must exist on the target node.

As suggested by the Jenkins plugin documentation we can put it in the templates and then copy it in Chef's file cache path with:

job_config = File.join(Chef::Config[:file_cache_path], 'job-config.xml')

template job_config do
  source 'webapp-job-config.xml.erb'
end

The job config file should look like this:

<?xml version='1.0' encoding='UTF-8'?>
<maven2-moduleset plugin="maven-plugin@2.7.1">
  <actions/>
  <description></description>
  <keepDependencies>false</keepDependencies>
  <properties/>
  <scm class="hudson.scm.SubversionSCM" plugin="subversion@1.54">
    <locations>
      <hudson.scm.SubversionSCM_-ModuleLocation>
        <remote>http://192.168.0.50/svn/repo/webapp/trunk</remote>
        <local>.</local>
        <depthOption>infinity</depthOption>
        <ignoreExternalsOption>false</ignoreExternalsOption>
      </hudson.scm.SubversionSCM_-ModuleLocation>
    </locations>
    <excludedRegions></excludedRegions>
    <includedRegions></includedRegions>
    <excludedUsers></excludedUsers>
    <excludedRevprop></excludedRevprop>
    <excludedCommitMessages></excludedCommitMessages>
    <workspaceUpdater class="hudson.scm.subversion.CheckoutUpdater"/>
    <ignoreDirPropChanges>false</ignoreDirPropChanges>
    <filterChangelog>false</filterChangelog>
  </scm>
  <canRoam>true</canRoam>
  <disabled>false</disabled>
  <blockBuildWhenDownstreamBuilding>false</blockBuildWhenDownstreamBuilding>
  <blockBuildWhenUpstreamBuilding>false</blockBuildWhenUpstreamBuilding>
  <triggers/>
  <concurrentBuild>false</concurrentBuild>
  <aggregatorStyleBuild>true</aggregatorStyleBuild>
  <incrementalBuild>false</incrementalBuild>
  <ignoreUpstremChanges>false</ignoreUpstremChanges>
  <archivingDisabled>false</archivingDisabled>
  <siteArchivingDisabled>false</siteArchivingDisabled>
  <fingerprintingDisabled>false</fingerprintingDisabled>
  <resolveDependencies>false</resolveDependencies>
  <processPlugins>false</processPlugins>
  <mavenValidationLevel>-1</mavenValidationLevel>
  <runHeadless>false</runHeadless>
  <disableTriggerDownstreamProjects>false</disableTriggerDownstreamProjects>
  <blockTriggerWhenBuilding>true</blockTriggerWhenBuilding>
  <settings class="jenkins.mvn.DefaultSettingsProvider"/>
  <globalSettings class="jenkins.mvn.DefaultGlobalSettingsProvider"/>
  <reporters/>
  <publishers/>
  <buildWrappers/>
  <prebuilders/>
  <postbuilders/>
  <runPostStepsIfResult>
    <name>FAILURE</name>
    <ordinal>2</ordinal>
    <color>RED</color>
    <completeBuild>true</completeBuild>
  </runPostStepsIfResult>
</maven2-moduleset>


Again, there are a lot of things we can do to have a flexible cookbook like the parametrization of the Subversion URL.

At last

jenkins_job 'Webapp' do
 config job_config
end

will create the job.

Now we only need to launch Chef to have a Jenkins machine configured and ready to launch the job.

In the next part we can launch Chef using Vagrant.

In the meanwhile, if you want to download the cookbook you can find it in this Github repo in the cookbooks/jenkins_server directory.

martedì 22 marzo 2011

Un po' di magia con le immagini

Sto sviluppando un applicativo per un grossista di penumatici e ho avuto la necessità di visualizzare i logo delle marche di pneumatici.
Apparentemente nulla di sconvolgente ... finché non ho visto i file che mi ha mandato il cliente.
Un centinaio di file jpeg tutti di dimensioni diverse! Andavano da circa 150x50 fino a circa 1000x500.
Sinceramente non avevo nessuna voglia di aprirli uno ad uno con GIMP per ridimensionarli.

Fortunatamente in ambiente Linux esiste un tool per la manipolazione di immagini da riga di comando: ImageMagick.

E' bastato installarlo dal packet manager della mia distro Linux e con 3 righe di bash:

for file in *.jpg; do
convert $file -strip -thumbnail 148x64 result/$file
done

Et voila, il gioco è fatto.

giovedì 19 novembre 2009

SqlTool

Ho scoperto di recente che HSQLDB possiede un piccolo tool, chiamato SqlTool, con cui è possibile connettersi ad un qualsiasi database e inviare comandi e script SQL da linea di comando.
Già questo ne fa uno strumento fondamentale, visto che esistono database che non offrono tool per l'invio di script SQL da shell.
Ma la vera forza è la possibilità di utilizzarlo dall'interno dei propri programmi.
Immaginate un applicativo che la prima volta che viene lanciato crea il suo database senza bisogno di intervento, o la possibilità di applicare patch al db dopo l'installazione di una nuova versione.
L'utilizzo è veramente semplice. Di seguito riporto un esempio:


String url = "jdbc:hsqldb:file:/java/provehsql/provedb;shutdown=true";
String user = "sa";
String pwd = "";
String sql = IOUtils.toString(Prova.class.getResourceAsStream("script.sql"));
SqlTool.objectMain(new String[] {
"--inlineRc",
"URL=" + url + ",USER=" + user + ",PASSWORD=" + pwd,
"--sql",
sql
});


Come si può notare ho caricato il contenuto di uno script file in una string (utilizzando Apache IOUtils) per poi passarlo al metodo objectMain() di SqlTool insieme all'url e alle credenziali per la connessione al DB.
Il metodo accetta un array di stringhe analogo a quanto farebbe il metodo main per i parametri della riga di comando.
L'unico reale impedimento che ho riscontrato è che non è possibile passare una password non vuota. Se l'utente del database ha una password impostata il metodo si ferma per leggerla dallo standard input, cosa che vanifica ogni tentativo di automatizzazione.

martedì 15 settembre 2009

Articolo su JavATE

Un mio articolo su JavATE è appena stato pubblicato sul sito di ZK.
Lo potete raggiungere a questo URL.

Grazie agli amici del team di ZK per questa possibilità di dare visibilità a JavATE.

venerdì 28 agosto 2009

JavATE 0.3

Di recente ho rilasciato la versione 0.3 del mio framework JavATE.
Le novità principali riguardano:

  • Un sottoprogetto completamente nuovo chiamato "AuthorizATE". Come si può intuire dal nome questo progetto si occupa dell'autorizzazione degli utenti.

  • TreeBrowser e TreeEditor per navigare ed editare alberi di oggetti.

  • Il meccanismo di validazione è stato completamente riscritto ed ora è indipendente dal progetto GuidATE. Ora può essere utilizzato anche da chi decide di utilizzare solamente DominATE.

  • Il ListEditor è stato completamente riscritto ed ora è molto più flessibile la gestione della lista che si sta modificando.

  • E' stato aggiunto un meccanismo basato sulle annotazioni che consente di dichiarare una property come dipendente da altre, in modo che quando scatta un evento di PropertyChange di una, scatta il corrispondente evento per tutte le property che da questa dipendono